Node.js NPM
Last updated onNode Package Manager (NPM) is an essential tool at the heart of the Node.js ecosystem. This is the defacto package manager for Node.js (so developers can manage and share reusable code modules effortlessly) NPM helps you to install, update, and manage libraries & dependencies for Node.js, and building the projects makes it a must-have tool for any javascript developer.
With this NPM Tutorial, I will guide you to publish your Javascript Packages and install them with your projects through a few NPM commands. You will also be taught how to find and select the right package in the repository.
So let’s get started with an overview of NPM.
Node JS NPM Overview
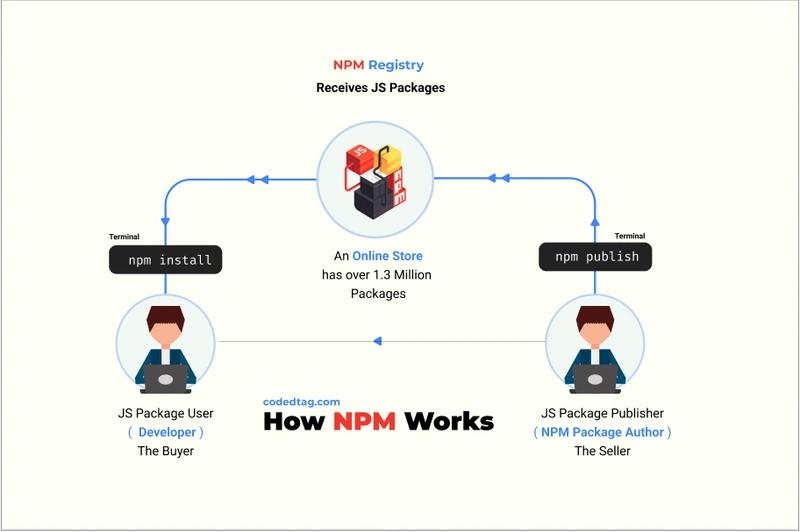
Basically, NPM is a Node Package Manager, a giant repository or large online store with over 1.3 million packages. These packages are developed by JavaScript users called publishers to serve JavaScript platforms and their technologies.
Additionally, it uses two parts to download JavaScript packages:
- An online store that contains all JavaScript packages.
- A command-line interface that allows developers to download and share their packages in the online repository.
Here are some prerequisites to get started with Node js NPM:
- Some knowledge of Javascript.
- Some Knowledge of Node.js
- Command-Line Interfaces ( CLI ) or Terminal
So, before getting started, let’s understand how Node js NPM works.
How Node js NPM Works
As mentioned, Node js NPM serves as an online repository for numerous JavaScript packages. However, it is important to identify who is uploading and publishing these packages.
Developers like you are the ones who upload and share their code in the NPM repository. They are known as NPM package authors or contributors. Their role is to assist others by providing packages that meet specific project needs.
NPM indexed the JavaScript packages according to stats and most downloaded packages. To help other developers who need to use those packages according to what is the best one to use.
Moreover, NPM significantly saves developers time by offering JavaScript packages that can be used instead of writing code from scratch, all accessible through various Node js NPM commands.

The process begins with initializing the command and then downloading the required functionalities into the Node.js modules folder. It is truly incredible to discover a module in the NPM repository that saves time, allowing you to avoid starting from scratch in coding—all through a few simple NPM commands.
Let’s move on to the following section to understand how to share and upload a new JavaScript package onto the registry.
Sharing and Publishing Node.js Packages
NPM package authors begin the process by executing several commands to upload and share their JavaScript packages. Through these commands, they manage dependencies and ensure their code is accessible to the broader developer community. They start with authentication — let’s delve into that.
NPM Login Command
Firstly, you need to have an account on npmjs.com through this registration page. Then open terminal or CLI.
- If your OS is windows, click on start ( windows icon ) and search for the command prompt.
- If the OS is Linux ( ubuntu ) or macOS, you have to open the system menu and then write in search “terminal” word.
NPM package authors must log in to their Node Package Manager account. This can be accomplished using the following command:
npm loginWhen you log in with your username and password, it will send you ( OTP ) to your email; you must insert it to verify your account.

You must write the following commands to create a project folder and explore it using CLI.
# For create new folder
mkdir codedtag-project

# To explore the created folder
cd codedtag-project
Authors use the initializing command to start and create their new projects. Let’s explore how that’s done.
NPM Init Command
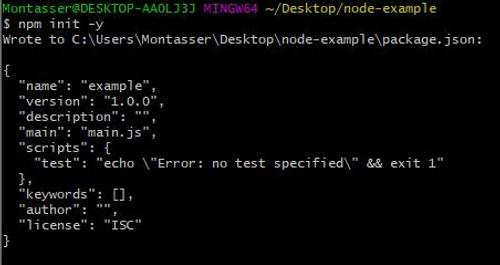
In the following step, you need to create the package.json file, which can be done using the below command.
npm initWhen you run the “npm init” command, it prompts you to fill out the properties for package.json, which contains information about your project.
In the following step, you will learn how to share your new JavaScript package on the registry.
NPM Publishing Command
Once you have completed developing your package, you can use the following command to share and publish it on the NPM registry:
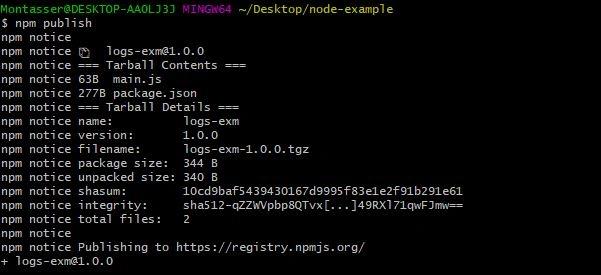
npm publishThe result should be like the below image.

Well done! You’ve learned how to share and upload your new package, making you an NPM package author. Now, let’s explore how to download a package that serves your project’s needs in the following section.
Downloading and Installing NPM Packages
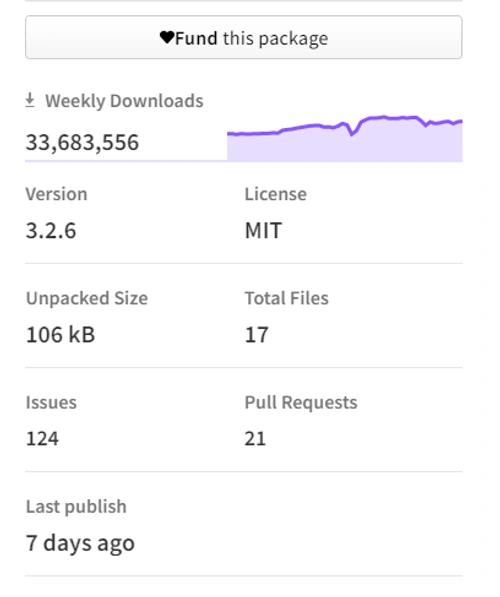
Before downloading the js package dependencies, some statistics deserve to be checked by the user. So, according to these statistics, the user should know which package is better.

In the previous image, you saw some information for the needed package like weekly downloads, version, and other details. This data aids package users in selecting the most suitable one, preventing wasted time on potentially problematic packages. These details serve as valuable guidance for users to find and identify the right package for their needs.
Additionally, there are two ways to search and find the node package manager package.
- Through the npmjs registry: Once you open the npmjs registry, you will see a search box. Just write down the needed package. It will show you indexed packages in descending order according to the most famous ones.
- Through the CLI or Terminal: There is a command to search for packages in the npm registry using CLI or Terminal. Only open your terminal or CLI and write npm search <package-name>. The results should be like the below image.

Once you decide which package to use, you must download it into the directory of your project.
There are a few commands to install and download Node js NPM package dependencies. You have to open the root of your project in CLI and then use the below command.
npm install <PACKAGE-NAME>Once you start the command, you will see the progress of the installation through the CLI or terminal. And a new folder is added to your project root called “node_modules” with created file “package-lock.json.”
When you run the “npm install” command without arguments or flags, it will list the new property with the “dependencies“ object containing the name.
Let’s see what is “node_modules” folder ?
Node.js Modules
The “node_modules” folder is a directory where Node.js stores all the packages that your project depends on. When you install a package using npm or yarn, it gets downloaded and stored in the “node_modules” folder. This folder helps manage dependencies and keeps your project organized by keeping all external packages in one place.
Actually, this action also affects another file called “package-lock.json.” Let’s proceed to the next section to comprehend the role of this file.
Package-lock json
Package-lock.json file is something like a watcher to detect if the package.json file has changed or not.
Most things that can change in the package.json file are the “version“ property and the “dependency” property. If values don’t match the values in package.json, the new values of package.json will be replaced automatically in both files.
Anyway, let’s take a look at the “package.json” file.
What is Package.json?
Package.json is like the label of a javascript package containing all project information. And it can be generated by using the “npm init“ command. It is also considered a document that has the needed or required specifications for the current package.
When you run “npm init” from the command line or terminal, you’ll be prompted to fill in several required fields. You’ll need to enter them one by one as you go through the initialization process.

- Name: it refers to the project or package name.
- Version: it refers to the version of the current package.
- Main: This property is used to know the name of the main.js file for this package.
- Description: It describes what the JavaScript package is used for
- Keywords: are many keywords followed by a comma to describe the package.
The following JSON snippet shows you the package JSON contents.
{
  "name": "celinia",
  "version": "1.0.0",
  "description": "",
  "main": "gulpfile.js",
  "scripts": {
    "test": "echo \"Error: no test specified\" && exit 1"
  },
  "keywords": [],
  "author": "",
  "license": "ISC",
  "devDependencies": {
    "@babel/core": "^7.11.6",
    "@babel/preset-env": "^7.11.5",
    "node-sass": "^4.14.1",
    "opentype.js": "^1.3.3",
    "serve-static": "^1.14.1"
  },
  "dependencies": {
	"browser-sync": "^2.26.14",
  }
}
In the following section you will understand the difference between dev dependencies and dependencies. Let’s dive in.
The Difference Between Dev Dependencies and Dependencies
Dev Dependencies
DevDependencies: An object includes all the packages or modules used in the package or project with its versions that are only needed in the testing and local development, not in the production.
The “devDependencies“ object is a property in the package.json file like the one shown below.
DevDependencies:{
   "jquery": "^3.6.0",
  "serve-static": "^1.14.1"
}
To install any module, you need in the local development just install the package using the following command.
npm install <PACKAGE-NAME> --save-devLet’s understand how to install a package in dependencies object.
Dependencies
Dependencies: An object includes all the packages or modules your application needs or requires at runtime. So you will not be able to work on this project before installing those required packages.
The “dependencies” object is a property in the package.json file like the one shown below.
Dependencies:{
  "jquery": "^3.6.0",
  "serve-static": "^1.14.1"
}
To install any module, you need to be in the production mode using the following command.
npm install <PACKAGE-NAME> --productionOR
npm install <PACKAGE-NAME>That’s all for now. Let’s proceed to the next section to learn how to customize a new script in the package.json file.
Adding Custom Scripts to the package.json File
Scripts object is a tool for managing and automating tasks in a Node.js project. It allows developers to define shortcuts for commands that would otherwise need to be typed out in full each time they are run, thereby saving time and reducing the scope for errors.
You can run it using the below command.
npm run <SCRIPT-NAME>

#OR

npm run-script <SCRIPT-NAME>
The “scripts” object is a property inside the package.json file like below
scripts:{
   "<SCRIPT-NAME>": "<THE-COMMAND-LINE-SHOULD-BE-HERE>"
}
For example, we need to print “CodedTag.com Tutorial “ text in terminal or CLI
scripts:{
   "print_me”: "echo \"CodedTag.com Tutorial\" && exit 1"
}
And to execute this command just run the below example in CLI or terminal.
npm run print_meIt will print the results like in the below image.

The standard uses case for scripts like compiling sass, minifying or starting your Node.js server, or anything else you want to write in the CLI or terminal related to your project.
Let’s move on to the section below to see a variety of useful NPM commands.
List Of Useful NPM Commands
- NPM Search Command: To search and find any js packages on the npm registry
npm search <PACKAGE-NAME> - NPM View Command: Watch and view any js package information like the latest published package and version, keywords, and much more information else npm view <PACKAGE-NAME>.
- NPM Login Command: Login to your account through email and password. This command sends you an email containing OTP verifying the code you must insert. npm login
- NPM Install Command: This command to install js packages. As we mentioned, it affects package.json, package-lock.json, and the “node_modules“ folder. npm, install <PACKAGE-NAME>.
- NPM Publish Command: Upload and publish your packages on the npm registry, but you will not be able to use this command before login in with the “npm login“ command npm publish <PACKAGE-NAME>.
- NPM Run Command: It runs all scripts listed on the “scripts” object. You could able to execute bash commands on your operating system.
npm run <PACKAGE-NAME>.
That’s all, let’s summarize it.
Wrapping Up
This guide helps you to use Node js NPM (Node Package Manager), a sizable repository of more than 1.3 million JavaScript packages, is given in this article. It walks users through the process of using the npm command-line interface (CLI) to upload, publish, and manage JavaScript packages.
The tutorial begins by highlighting the importance of having basic knowledge of JavaScript, Node.js, and familiarity with CLI or Terminal.
Additionally, it describes the steps involved in beginning a new project with npm init, generating a project folder, publishing the project with npm publish, and authenticating with npm login.
Moreover, It provides instructions on how to download the required packages into the project directory by using npm install for package installation. It goes over the organization and function of package-lock.json and the node_modules folder in project dependency management.
The article also defines the “package.json”. The project’s manifest is a JSON file that details its contents, including metadata such as name, version, and dependencies. It distinguishes between dependencies for runtime modules and development. Dependences on development-only modules.
Additionally, it covers how to add custom scripts to the package.json file to automate tasks using npm run <SCRIPT-NAME>, enhancing productivity and reducing potential errors.
Thank you for reading. Happy Coding!
Did you find this tutorial useful?
Your feedback helps us improve our tutorials.